The Process and the Products to Help You Slay your Frontal Wig
It seems like the lace front wig may be the answer to all of our problems. Opting for one may help ease your morning hair routine.
Waking up and dealing with natural hair can be a pain.
Frankly, sometime sew-ins can add to your morning stress as well. Tight braids with loose tracks and coping with your leave out can sometimes make you want to risk it all and shave everything in sight.
Let me show you how to make a lace front look natural, how to put on a wig, and get your look on point!

The Lace Front Wig
Have you ever asked yourself: What is a lace front wig?
Lace front wigs have been around in Hollywood for at least the last ten years.
They were initially used to turn actors into your favorite character within a matter of minutes, think Mrs. Doubtfire. Nevertheless, It wasn’t until the actors started realizing that these same wigs can be worn every day.
The good news is these wigs are available to everyone, but the bad news is not everyone knows how to secure a wig, and that means a lot of people are walking around with adhesive residue on their hairline, no edges, or air pockets where their lace should be smoothed and secure. Follow these steps.
Supplies Needed:
- Mixing Bowl
- Applicator Brush
- Bleaching Powder
- Developer (10 or 20 volume)
- Wig Cap that matches your skin color or stocking
- Blow Drier
- Gots2B Glue
- Gots2B Freeze Spray
- Rattail comb
- Helmet Head Hairspray
- Toothbrush

How to Make A Lace Front Wig
The steps you take to construct a lace front wig are crucial for how to make a wig look natural. It must look natural for it to pop! We will dive in a bit more on how you can customize one whether you made it or not but, most importantly, the foundation matters.
There are a couple of ways on how to make a lace front wig but nothing is better than needle and thread. It's also good to have the proper sewing technique on how you sew your frontal down at the beginning of making your lace front wig.
Making your own wig can be fun and time-consuming but there are ways you can learn to ensure the process is effortless and stressless.
Customize the Frontal
You may want to know why this step is essential.
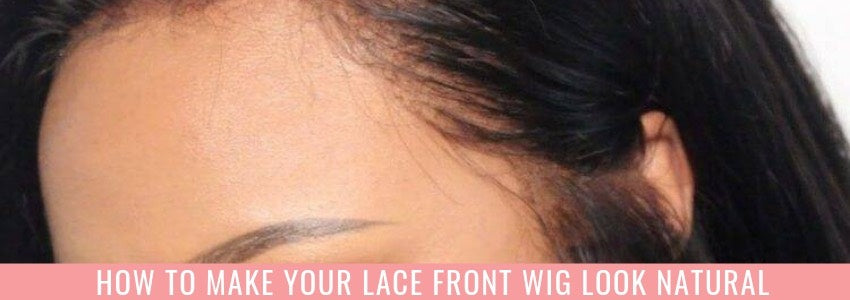
When the hair is tied to the lace of the lace front wig leaves a knot where the hair is connected. This knot is visible against your skin tone, and that is a dead giveaway that your hair is not growing directly from your scalp.
To reduce the appearance of the knots we want to bleach the area of the lace that you will be parting as you style your lace front wig.
Mix your bleaching powder with your developer in your mixing bowl to make a smooth consistency of bleach. Do not make it too soupy. You want the mixture to be of a pudding consistency, but unable to seep through the lace. You do not want to accidentally bleach the hair.
Get your frontal on a flat even surface and lace side up slowly and gently dab the bleach mix onto your lace to bleach the knots. Get the product on the lace as quickly and as evenly as possible.
Wait about 15 to 20 minutes depending on the developer used.
Wash Your Frontal
Use lukewarm water rinse the bleach from the frontal portion of your wig.
Use a neutralizing shampoo and wash your wig. Be sure to get ALL of the bleach off of the lace and rinsed out of the wig.
Once you have washed the wig, set it on your wig stand, and examine the hairline. Tweeze the hairline to your liking to make it look realistic. Be sure to thin out the perfectly straight line hairline. This part is very time consuming, and it can take about an hour. The key is to target hairs that look too uniform in the wig’s hairline.
You can also create baby hairs by cutting some of the long strands at the perimeter of the wig and create some shorter pieces.
Also, pull out some hairs that make the base of the hairline look dense.
Be careful not to tweeze too much! Part the wig as you go through and customize the hairline. You do not want to part the wig and realize you have created a bald spot.

How to Wear a Lace Front Wig
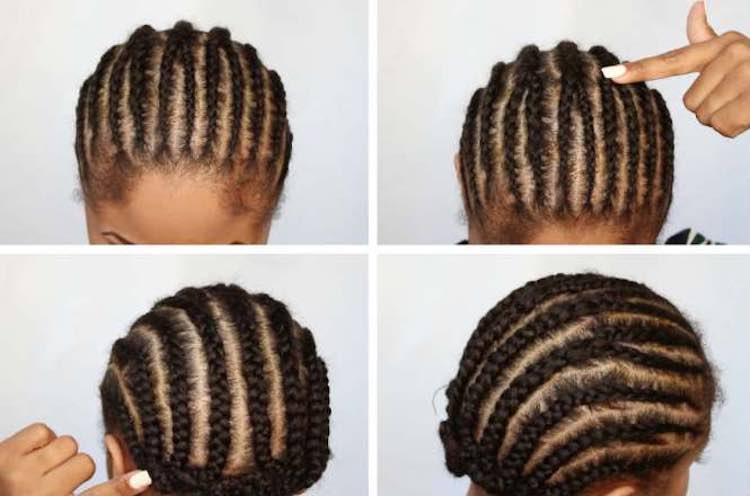
The way you position and place your lace front wig is another vital factor in making sure it looks as natural as possible. The steps on how to put on a lace front wig are super easy and it all starts with your natural braided hair.
Braid your hair up in a simple style.
I would suggest braiding your hair straight back. If you have extremely thick hair, you can still braid a straight back braid pattern, but when you secure your braids that go past your neck sew each on upward and attach it the braid on your scalp. This part is important for knowing how to apply a lace front wig correctly.
Do not group the braids and sew them down because you will create an uncomfortable bulging mass of hair at the nape of your neck and no stocking or wig cap will be able to compress that.
TRUST ME.
Use The Right Gel or Adhesive
Place your wig cap or stocking cap on over your braid pattern and use Got 2B Glued or adhesive gel of choice and apply the product to the perimeter of your hairline. When it dries, you can cut away the extra wig cap or stocking cap. However, I would suggest always spraying some Got 2B Freeze spray as well! Spraying will enable your cap to have extra hold. When you start to cut away from your cap, it will not lift up. You want the adhesive to be completely dry on the cap so if you have to, use a blow dryer and blow some warm/cool air on the perimeter of your hairline.
Once the adhesive is completely dried, you can cut away the wig cap band OR scoot the stocking cap back and just put a little Got2B Glued on the edges. Either way, you want the excess material from your base cut away from your hairline.
Put your lace front wig on your head. Do not start to secure the wig. Place the wig on your head and pull it back from the perimeter of your head.
Now you can add a little more adhesive product to your wig cap hairline, but it should not be completely dry. You want it to be “tacky” sticky and a little wet but not dry.
Secure Your Wig
Begin to secure your wig that has been cut and pre-fit to your head by pressing the edges to your hairline with your nail or a comb where you have the tacky, adhesive substance.If you use your fingers and the glue has not dried all of the ways it may turn white and then you will have to remove and restart.
Take your blow dryer and blow dry your perimeter.

Style Your Edges
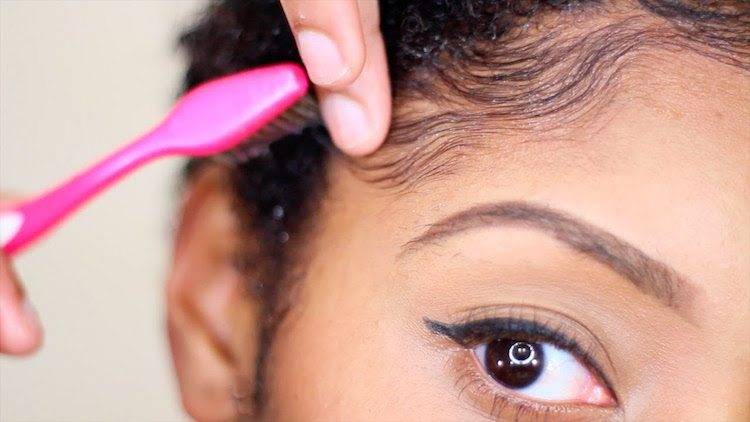
Lastly, it is all about the baby hairs!
Take some Helmet Head Hairspray and spray it on a bristle brush or toothbrush. Hold down your frontal wig and shape your baby hairs the way you want your baby hairs on your frontal to be.
How to Make a Wig Look Real in The Front
Not everyone wants to stick to the same natural brown hair color that most bundles and frontals offer. To spice things up, coloring your wig is another way to make it look very natural. Therefore, choosing the right color for your skin tone is the first step on how to make a lace front wig look natural. Once you've matched and gotten the right color, it's all about the way you color it. It's always best to color your bundles and frontal before you make a lace front wig but if already constructed, you can still successfully color it.
Wear gloves while doing so and apply the color to the lace front wig while it is stably placed on a mannequin head to ensure no messes. Once you've gone through and applied the hair color to it, simply take a wide-tooth comb and brush through the hair strands to make sure hair color is being distributed evenly.
There you have it! A Natural Lace Front Look!
Natural-looking wigs are the best kind of wigs. Therefore, if you follow these instructions, you will have the option to rock a lace front wig. It is an amazing protective style, but it does take a little work! Will you be rocking a lace front wig soon?
Leave a comment below and let us know!
